
HR Driven Provisioning is an approach to workforce management that places HR Management Systems at the forefront of the employee onboarding and provisioning process. In today’s dynamic business environment, organizations recognize the critical role played by HR in not just recruiting and hiring talent but also in ensuring a seamless integration of new employees into the company ecosystem. HR Driven Provisioning goes beyond traditional onboarding methods, leveraging HR’s insights and expertise to orchestrate a comprehensive and personalized provisioning experience for every employee. By placing HR system as the new source of truth for identities during the provisioning journey, organizations can create a more agile, responsive, and employee-centric onboarding process that contributes to long-term success and a positive workplace culture.
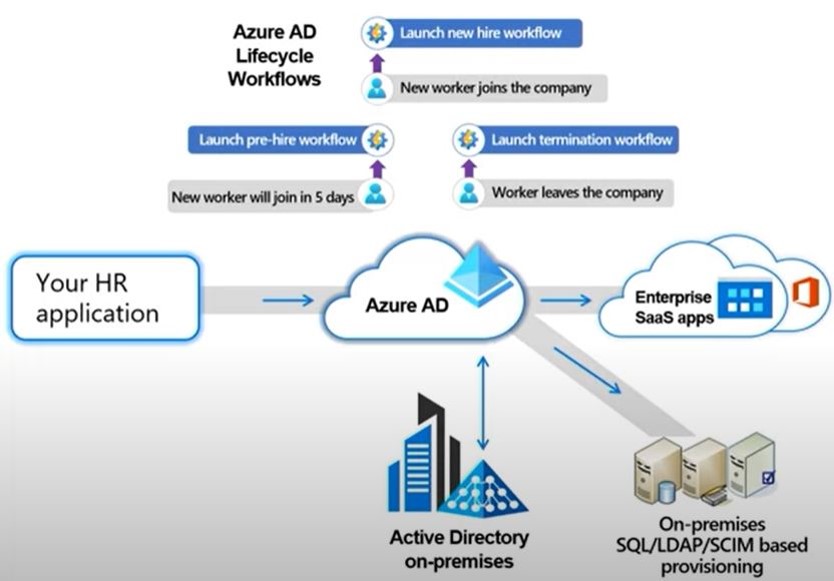
Microsoft Entra ID Lifecycle Workflows represent a robust and dynamic framework for managing the entire lifecycle of user identities within an organization’s digital ecosystem. As businesses increasingly rely on cloud services and hybrid infrastructures, effective identity lifecycle management becomes paramount. Entra ID Lifecycle Workflows offer a comprehensive solution, enabling administrators to automate and streamline processes related to user provisioning, deprovisioning, and ongoing management.
This innovative framework leverages the power of Entra ID, providing organizations with the tools to define and customize workflows that align with their unique business requirements. From the moment a user joins the organization to changes in roles, and eventually to user departure, Entra ID Lifecycle Workflows ensure a secure, efficient, and compliant management of identity and access.
With features such as automated user provisioning, role-based access control, and customizable policies, Entra ID Lifecycle Workflows empower administrators to maintain accurate and up-to-date identity information while reducing manual intervention. This not only enhances security by promptly revoking access for departing users but also contributes to operational efficiency and regulatory compliance.
In summary, Entra ID Lifecycle Workflows offer a sophisticated and adaptable solution to the challenges of identity lifecycle management, enabling organizations to efficiently govern user identities throughout their journey within the digital landscape
Internet is full of articles explaining integration configuration with well known HR systems like Workday and SAP SuccessFactors, here we are going to focus on anything but these two HR systems.
Microsoft offers user provisioning integration with any HR system app which is capable of sending SCIM payload as the worker data to Azure Identity Provisioning Service. There is a gallery enterprise app in app gallery just for this purpose as shown in picture below.

We are going to focus on the second app, provisioning to on-prem AD because most of the enterprise continue to remain Hybrid. Several inbound user provisioning scenarios are enabled using API-driven inbound provisioning. This diagram demonstrates the most common scenarios.
Supported Scenarios
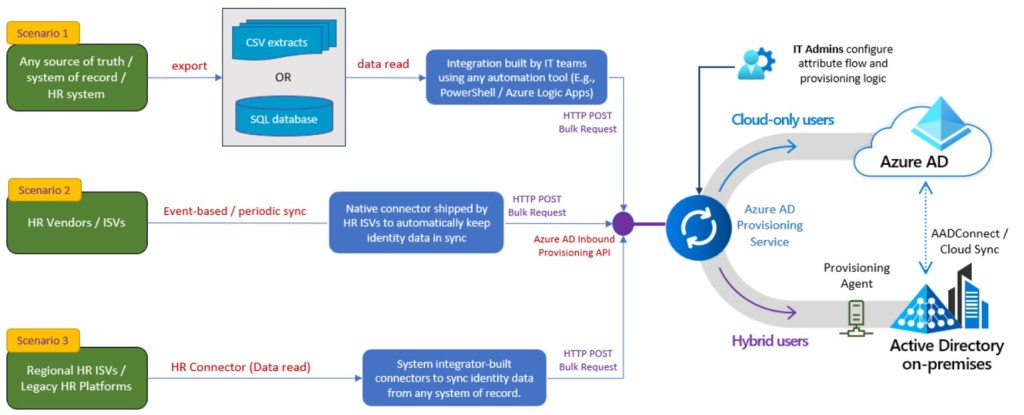
Scenario 1: Facilitate the import of HR data extracts by IT teams through various automation tools Commonly utilized in enterprise integration scenarios, flat files, CSV files, and SQL staging tables play a key role. Employee, contractor, and vendor information is regularly exported in these formats, and IT teams employ automation tools, such as PowerShell scripts or Azure Logic Apps, for seamless synchronization with enterprise identity directories. The use of API-driven inbound provisioning allows IT teams the flexibility to choose any automation tool, thereby modernizing and simplifying the integration process.
Scenario 2: Empower ISVs to establish direct integration with Microsoft Entra ID By leveraging API-driven inbound provisioning, HR ISVs can create native synchronization experiences, enabling automatic updates in the HR system to seamlessly propagate into Microsoft Entra ID and connected on-premises Active Directory domains. For instance, an HR app or student information systems app can transmit data to Microsoft Entra ID immediately after a transaction or as part of an end-of-day bulk update.
Scenario 3: Enable system integrators to expand the range of connectors for systems of record Partners have the capability to develop tailored HR connectors to address diverse integration needs related to the flow of data from systems of record to Microsoft Entra ID.
Across all these scenarios, the integration process is significantly streamlined, as the Microsoft Entra provisioning service assumes the responsibility for identity profile comparison. It also restricts data synchronization through scoping logic configured by IT administrators and executes rule-based attribute flow and transformation managed in the Microsoft Entra admin center.
The Flow

1. IT Admin configures an API-driven inbound user provisioning app from the Microsoft Entra Enterprise App gallery.
2. IT Admin grants access permissions and provides endpoint access details to the API developer/partner/system integrator.
3. The API developer/partner/system integrator builds an API client to send authoritative identity data to Microsoft Entra ID.
4. The API client reads identity data from the authoritative source.
5. The API client sends a POST request to provisioning /bulkUpload API endpoint associated with the provisioning app.
6. If successful, an Accepted 202 Status is returned.
7. The Microsoft Entra provisioning service processes the data received, applies the attribute mapping rules and completes user provisioning.
8. Depending on the provisioning app configured, the user is provisioned either into on-premises Active Directory (for hybrid users) or Microsoft Entra ID (for cloud-only users).
9. The API Client then queries the provisioning logs API endpoint for the status of each record sent.
10. If the processing of any record fails, the API client can check the error details and include records corresponding to the failed operations in the next bulk request (step 5).
11. At any time, the IT Admin can check the status of the provisioning job and view events in the provisioning logs.
Lifecycle Workflow Tasks
List of Predefined Tasks
Add user to groups
Add user to selected teams
Delete User Account
Disable User Account
Enable User Account
Generate Temp Access Pass (TAP) and Send Email
Remove all licenses of user
Remove user from all groups
Remove user from all Teams
Remove user from selected groups
Remove user from selected Teams
Run a Custom Task Extension
Send email after user’s last day
Send email before user’s last day
Send email on user’s last day
Send Welcome Email
Send onboarding reminder email
Request user access package assignment
Remove access package assignment for user
Remove all access package assignments for user
Cancel all pending access package assignment requests for users
License requirements
HR Driven Provisioning (Azure AD Identity provisioning service)
Using this feature requires atleast Microsoft Entra P1 license
Azure AD lifecycle workflows License features list & comparison
Using this feature requires Microsoft Entra ID Governance license.
Lifecycle Workflows (Limitations & Features)
Limitations:
Create, manage, and delete workflows up to the total limit of 50 workflows.
On-demand workflows can be run against maximum of 10 users.
Maximum of 25 custom tasks can be used in a workflow.
Up to 100 custom task extensions can be used in your workflows.
Features:
Dashboard – Get glanceable cards and identity governance status reports.
Entitlement management – Automate access delegation & revocation using “access packages“.
Machine learning assisted access reviews
Deployment Steps
HR System to AD inbound user provisioning
1: Register an enterprise app in Azure AD for the HR System user provisioning to on-prem AD
2: Create service account/gmsa with account creation permission in on-prem AD
3: Deploy AAD connect provisioning agent on-prem
4: Complete attribute mappings, ensure that the “matching identifier” attribute is unique and set for every user in all directories.
5: Do app registration, configure appropriate graph permissions user provisioning and create a client secret.
6: The API developer/partner builds an API client to send authoritative identity data to Microsoft Entra ID.
7: Share app ID, Client Secret, Tenant ID with API client/partner to establish connectivity with HR system to let it send worker data in the form of SCIM packages
8: The API client reads identity data from the authoritative source.
9: The API client sends a POST request to provisioning /bulkUpload AAD API endpoint associated with the provisioning app.
10: Configure “scoping rules” to limit test provisioning for a subset of test users (provision on demand feature can also be used).
Lifecycle workflow planning
11: Engage right stakeholders like IT, compliance, security, HR Development etc teams.
12: Determine the pre and post onboard, offboard, real-time termination, change etc scenarios.
13: Determine the workflow execution scope and trigger conditions.
14: Review predefined workflow tasks, create custom tasks as per requirement.
15: Create workflows, test, review results and then follow process before deployment.
16: Perform testing with HR staff for all possible joiner, mover, leaver scenarios.
17: After discussing with business decide on a cutover date, prepare end user communication, take downtime for HR system to avoid any change in user data.
18: Considering above steps were successful, the scoping rules can be modified for a phased go-live or a full cutover.
Implementation
1. Install the enterprise app “API-driven provisioning to on-premises Active Directory”
2. Install provisioning service agent on-prem. Agent installer can be found under provisioning blade in the enterprise app.

3. Configure provisioning settings.
a. Enter default OU DN and establish connection.
b. Configure attribute mappings. (providing the Notification Email in Settings is mandatory. (Providing the Notification Email in Settings is mandatory)

4. configure service principle with graph permission to send /bulkupload API and query provisioning logs API.
a. Create client secret with 24 month validity.
b. Permissions: Application, SynchronizationData-User.Uplpoad, Auditlog.Read.All.

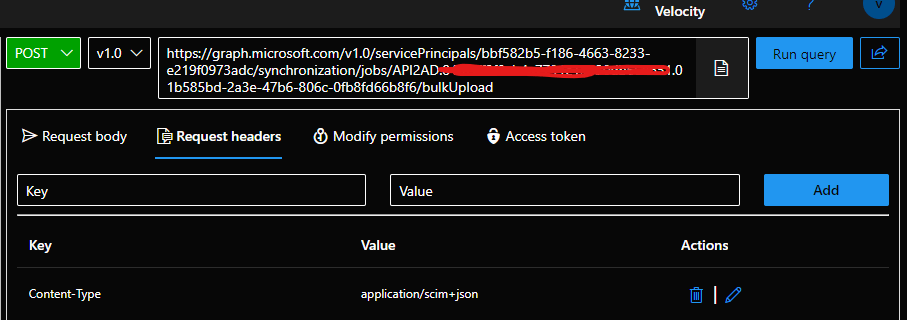
5. Test /bulkupload provisioning request with graph explorer.
Sample SCIM Payload Data
{
    "schemas": ["urn:ietf:params:scim:api:messages:2.0:BulkRequest"],
    "Operations": [
    {
        "method": "POST",
        "bulkId": "701984",
        "path": "/Users",
        "data": {
            "schemas": ["urn:ietf:params:scim:schemas:core:2.0:User",
            "urn:ietf:params:scim:schemas:extension:enterprise:2.0:User",
            "urn:ietf:params:scim:schemas:extension:contoso:1.0:User"],
            "externalId": "701984",
            "userName": "bjensen@vinytech.com",
            "name": {
                "formatted": "Ms. Barbara J Jensen, III",
                "familyName": "Jensen",
                "givenName": "Barbara",
                "middleName": "Jane",
                "honorificPrefix": "Ms.",
                "honorificSuffix": "III"
            },
            "displayName": "Babs Jensen",
            "nickName": "Babs",
            "emails": [
            {
              "value": "bjensen@vinytech.com",
              "type": "work",
              "primary": true
            }
            ],
            "addresses": [
            {
              "type": "work",
              "streetAddress": "234300 Universal City Plaza",
              "locality": "Hollywood",
              "region": "CA",
              "postalCode": "91608",
              "country": "USA",
              "formatted": "100 Universal City Plaza\nHollywood, CA 91608 USA",
              "primary": true
            }
            ],
            "phoneNumbers": [
            {
              "value": "555-555-5555",
              "type": "work"
            }
            ],
            "userType": "Employee",
            "title": "Tour Guide",
            "preferredLanguage": "en-US",
            "locale": "en-US",
            "timezone": "America/Los_Angeles",
            "active":true,
            "urn:ietf:params:scim:schemas:extension:enterprise:2.0:User": {
                "employeeNumber": "701984",
                "costCenter": "4130",
                "organization": "Universal Studios",
                "division": "Theme Park",
                "department": "Tour Operations",
                "manager": {
                  "value": "89607",
                  "displayName": "John Smith"
                 }
            },
            "urn:ietf:params:scim:schemas:extension:contoso:1.0:User": {
                "HireDate": "2021-05-01T00:00:00-05:00",
                "JobCode": "TG-1001"
            }
        }
    },
    {
        "method": "POST",
        "bulkId": "701985",
        "path": "/Users",
        "data": {
            "schemas": ["urn:ietf:params:scim:schemas:core:2.0:User",
            "urn:ietf:params:scim:schemas:extension:enterprise:2.0:User",
            "urn:ietf:params:scim:schemas:extension:contoso:1.0:User"],
            "externalId": "701985",
            "userName": "Kjensen@vinytech.com",
            "name": {
                "formatted": "Ms. Kathy J Jensen, III",
                "familyName": "Jensen",
                "givenName": "Kathy",
                "middleName": "Jane",
                "honorificPrefix": "Ms.",
                "honorificSuffix": "III"
            },
            "displayName": "Kathy Jensen",
            "nickName": "Kathy",
            "emails": [
            {
              "value": "kjensen@vinytech.com",
              "type": "work",
              "primary": true
            }
            ],
            "addresses": [
            {
              "type": "work",
              "streetAddress": "100 Oracle City Plaza",
              "locality": "Hollywood",
              "region": "CA",
              "postalCode": "91618",
              "country": "USA",
              "formatted": "100 Oracle City Plaza\nHollywood, CA 91618 USA",
              "primary": true
            }
            ],
            "phoneNumbers": [
            {
              "value": "555-555-5545",
              "type": "work"
            }
            ],
            "userType": "Employee",
            "title": "Tour Lead",
            "preferredLanguage": "en-US",
            "locale": "en-US",
            "timezone": "America/Los_Angeles",
            "active":true,
            "urn:ietf:params:scim:schemas:extension:enterprise:2.0:User": {
              "employeeNumber": "701984",
              "costCenter": "4130",
              "organization": "Universal Studios",
              "division": "Theme Park",
              "department": "Tour Operations",
              "manager": {
                "value": "701984",
                "displayName": "Barbara Jensen"
             }
            },
            "urn:ietf:params:scim:schemas:extension:contoso:1.0:User": {
                "HireDate": "2022-07-15T00:00:00-05:00",
                "JobCode": "TL-1003"
            }
        }
    }
],
    "failOnErrors": null
}
- Sign in with global Admin to https://developer.microsoft.com/en-us/graph/graph-explorer
- In the API request panel, set the HTTP request type to POST.
- Copy and paste the provisioning API endpoint retrieved from the provisioning app overview page.
- Under the Request headers panel, add a new key value pair of Content-Type = application/scim+json.
- Under the Request body panel, copy-paste the bulk request with SCIM Enterprise User Schema
- Click on the Run query button to send the request to the provisioning API endpoint.
- If the request is sent successfully, you’ll get an Accepted 202 response from the API endpoint.
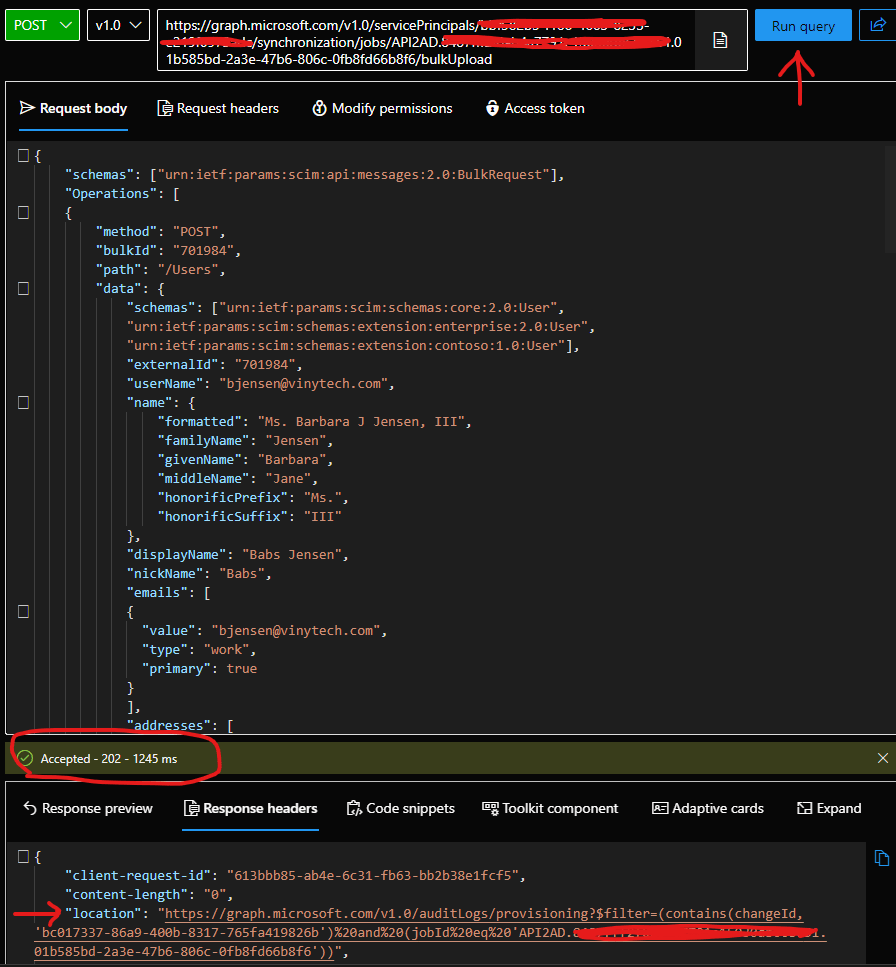
- Open the Response headers panel and copy the URL value of the location attribute. This points to the provisioning logs API endpoint that you can query to check the provisioning status of users present in the bulk request.
- Check AD for new users, verify all attributes.
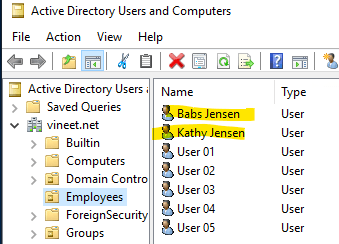
- Check provisioning logs

Microsoft provides a very good powershell script at https://github.com/AzureAD/entra-id-inbound-provisioning which has very cool features built-in.
They’ve done a wonderful job in documenting the usage of this script as well https://learn.microsoft.com/en-us/entra/identity/app-provisioning/inbound-provisioning-api-powershell
Set the execution policy to let the script run
set-executionpolicy remotesigned -Force
Install required powershell modules.
Install-Module -Name Microsoft.Graph.Applications,Microsoft.Graph.Reports
Import the attribute mapping file to a variable
$AttributeMapping = Import-PowerShellDataFile ‘c:\temp\CSV2SCIM\Samples\AttributeMapping.psd1’
Vaalidate your input csv if it is fine as per the attribute mapping table.
.\src\CSV2SCIM.ps1 -Path ‘c:\temp\CSV2SCIM\Samples\csv-with-2-records.csv’ -AttributeMapping $AttributeMapping -ValidateAttributeMapping
Run the below command to convert each coloumn in csv to a SCIM user schema payload and send it to API provisioning service. It will prompt you for authentication if an authenticated session doesn’t already exist for this tenant. Provide your consent to permissions prompted during authentication.
.\src\CSV2SCIM.ps1 -Path ‘c:\temp\CSV2SCIM\Samples\csv-with-2-records.csv’ -AttributeMapping $AttributeMapping -ServicePrincipalId XXXXXXX-XXXXXX-XXXXXX -TenantId YYYYYY-YYYYYYY-YYYYYY
. You will observer that the mail and UPN attribute will have .onmicrosoft.com as the domain suffix which we do not want for on-prem users. Go to attribute mappings of the provisioning app in Entra ID and change default expression from as shown below to Append(Append(Append([name.givenName], “.”), [name.familyName]), “@domain.com”)

Save mappings and run the powershell script again and you’ll see correct email and UPN suffix in on-prem users.
.\src\CSV2SCIM.ps1 -Path ‘c:\temp\CSV2SCIM\Samples\csv-with-2-records.csv’ -AttributeMapping $AttributeMapping -ServicePrincipalId XXXXXXX-XXXXXX-XXXXXX -TenantId YYYYYY-YYYYYYY-YYYYYY
A very good article from Microsoft which explains about building expressions.
